Transparency Note: This article may contain affiliate links. If you click and purchase, we may earn a small commission at no extra cost to you. We only recommend tools we have personally tested.
What Is Dreamina AI? A Simple Guide for Creators
You have been scrolling through CapCut, spotting “Dreamina AI” in the menus, watching other creators post stunning AI visuals — and quietly wondering if you are already falling behind. The fear is real: pick the wrong AI image generator, burn hours on bad outputs, and your content still looks generic. I have been there. This guide cuts through every confusion so you walk away knowing exactly what Dreamina AI is, how it works, and how to make it produce professional results on your very first session.

Quick Answer – What Is Dreamina AI?
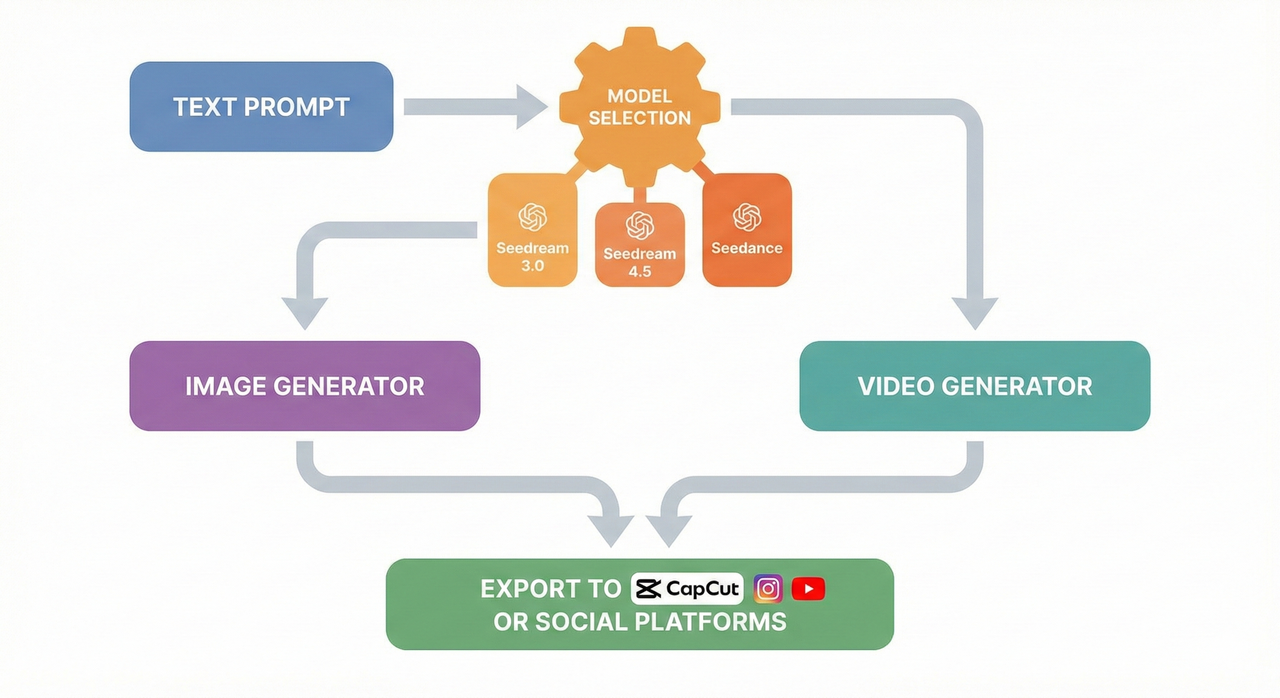
Dreamina AI is CapCut’s cloud-based generative AI suite built by ByteDance’s FaceMeng Technology team. It turns text prompts and reference images into high-resolution images and short videos using proprietary models — including the Seedream 3.0 model, Seedream 4.5 model, and Seedance image-to-video — all accessible via browser or directly through CapCut integration. It is free to start, with paid tiers for advanced outputs. Dreamina Official Site
Why Creators Are Confused About Dreamina AI
Is Dreamina AI an App, a Model, or Just a Filter?
The single biggest confusion I see in creator communities is this: people assume Dreamina AI is just another “AI filter” button buried inside CapCut — like a Snapchat-style effect. It is not.
Dreamina AI is a full visual creation platform. Specifically, it is developed by FaceMeng Technology, a ByteDance subsidiary (the same group behind TikTok), and its entire purpose is to make professional-grade AI-generated art and video accessible to people who have never touched Photoshop or Stable Diffusion. It is not a third-party plugin, not a single model, and not a simple one-click filter. Think of it as a dedicated AI studio that ByteDance built and embedded into the CapCut ecosystem.
You can access it in two places:
- Browser: At dreamina.capcut.com — a standalone web tool with its own dashboard.
- Inside CapCut: Under the AI Image, AI Art, and AI Video panels in the editor.
Dreamina AI vs Generic CapCut AI Filters
Here is the practical difference that matters for your workflow:
| Feature | Generic CapCut AI Filters | Dreamina AI |
|---|---|---|
| What it does | Applies a style overlay to existing footage or photos | Generates brand-new images or videos from your text or a reference image |
| Input | Your existing clip or photo | A text prompt or reference image |
| Output quality | Standard effect layer | Up to 2K resolution, photorealistic generation |
| Models | Fixed platform effects | Seedream 3.0, Seedream 4.5, Seedance |
| Use case | Quick aesthetic tweak | Thumbnails, ad creatives, product shots, motion clips |
Choosing the wrong one — slapping a filter on a photo when you actually needed a custom-generated thumbnail — is exactly the kind of mistake that burns time and produces underwhelming results. I have seen creators go weeks thinking they were “using Dreamina AI” when they were just cycling through built-in CapCut filters.
Dreamina AI vs Other Tools (e.g., DreamStudio)
This one trips up even experienced users. Dreamina AI is entirely separate from Stability AI’s DreamStudio. The name overlap is unfortunate, but the products, companies, and underlying models are completely different.
- DreamStudio (by Stability AI) is a general-purpose platform for accessing Stable Diffusion models with granular controls — aimed at power users.
- Dreamina AI (by ByteDance/CapCut) is purpose-built for social media creators and video editors, tightly integrated with TikTok and CapCut production workflows, and optimized for fast, accessible generation — not deep technical fine-tuning.
If you need production visuals inside your CapCut timeline, Dreamina AI is where you should be. If you need custom LoRA models or ComfyUI-style node pipelines, DreamStudio or open-source tools are your path.
How Dreamina AI Works (In Plain English)
The core idea is simple: Dreamina AI takes an input (text, an image, or both), feeds it through a specialized AI model, and outputs either a new image or a short video. The model you choose determines the quality, style, and format of that output.
Core Pipelines – Text-to-Image, Image-to-Image, Image-to-Video
There are three fundamental pipelines inside Dreamina AI, and knowing which one to reach for is half the skill:
1. Text-to-Image Generation
You type a description — a “prompt” — and Dreamina AI generates a completely new image from scratch. This is the pipeline you use for:
- YouTube thumbnails you have visualized but cannot photograph
- Product lifestyle shots without a photoshoot
- Posters, social cards, and ad banners
2. Image-to-Image Editing
You upload an existing photo and instruct Dreamina AI to restyle, enhance, or transform it. This leverages AI art styles and templates to maintain composition while shifting the visual mood. Great for:
- Elevating rough product photos to polished catalog quality
- Applying consistent brand aesthetics to varied photo inputs
- Concept exploration from a rough sketch or mockup
3. Seedance Image-to-Video
You feed a still image into the Seedance image-to-video pipeline and Dreamina AI animates it into a short motion clip with camera movement, particle effects, or scene transitions. This is the pipeline creators use for:
- Animated intro cards
- Social media teasers from static product images
- Motion thumbnails and loop content
The Dreamina Models: Seedream 3.0, Seedream 4.5, Seedance
The model you select is the most impactful decision you make inside Dreamina AI. Each is optimized for a different job:
| Model | Best For | Key Strength |
|---|---|---|
| Seedream 3.0 | Posters, text-heavy designs, product shots | Realistic 2K output, strong text rendering on imagery |
| Seedream 4.5 | General-purpose image generation at speed | Faster generation, higher perceived quality for everyday visuals |
| Seedance | Animating stills, motion clips, video teasers | Smooth, natural motion from a single reference image |
In my testing, Seedream 3.0 is the model to reach for any time your image needs readable text baked in — event posters, sale banners, product labels. Seedream 4.5 is my everyday driver for thumbnails and social graphics because it balances quality and generation speed extremely well. Dreamina AI Image Generator
Key Features Creators Actually Use
Dreamina AI Image Generator
The Dreamina AI image generator is the tool you will use most often. The interface is clean and deliberately beginner-friendly:
- Prompt box: Free-text description of what you want generated
- Style presets: Pre-built visual modes (Cinematic, Anime, Illustration, Photorealistic, etc.)
- Aspect ratio selector: Presets for YouTube (16:9), TikTok/Reels (9:16), square (1:1), and custom sizes
- Model selector: Switch between Seedream 3.0 and Seedream 4.5 before generating
- Reference image upload: Attach a photo to guide composition, color, or character consistency
Most common use cases I put through this tool:
- YouTube thumbnails — especially high-emotion facial expression shots that are hard to photograph
- TikTok covers and social posts — fast, on-brand visual hooks
- Ad creatives — product-in-context shots without a studio budget
- Product catalog images — clean backgrounds, varied angles
Dreamina AI Video Generator
The Dreamina AI video generator (powered by Seedance) lets you convert a still image into a short dynamic video clip — typically 3 to 6 seconds — with motion built in. You can control:
- Motion intensity (subtle drift vs. dramatic movement)
- Camera movement (pan, zoom, orbit)
- Scene transitions (fade, cut, wipe)
Practical applications I actually use this for:
- Intro title cards — animated logo stings or show openers
- Social media teasers — product reveals, event announcements with motion
- Motion posters — the type of content that stops the scroll when static images no longer do
CapCut Integration and Workflow
The CapCut integration is what sets Dreamina AI apart from standalone generators like MidJourney or Adobe Firefly for creators already inside the CapCut ecosystem. Inside CapCut, Dreamina appears under the AI Tools panel as:
- AI Image → opens the Dreamina image generator
- AI Art → applies style-based generation with templates
- AI Video → triggers the Seedance image-to-video pipeline
My recommended workflow for typical content:
- Generate your image or video asset inside Dreamina (browser or CapCut)
- Insert directly into your CapCut timeline — no file download and re-import needed when using in-app
- Trim and layer — add captions, transitions, voiceover
- Export at the target platform resolution
This integration alone saves me 10–15 minutes per video compared to generating assets externally and importing them.
Dreamina AI Pricing Plans and Limits
Free Tier – What You Get
Dreamina AI is genuinely usable for free, which is one of its strongest advantages for new creators. The free tier includes:
- A set number of daily or monthly generation credits (the exact number can change — always check the current dashboard)
- Standard resolution exports (lower than HD in some cases)
- Access to core models including Seedream and basic Seedance functionality
- Potential watermark restrictions on some premium export features
Best fit: Casual creators experimenting with the platform, early testing of styles and prompts, personal-use social content. If you are not running paid ads or working with clients, the free tier gives you a real taste of what the tool can do.
Paid Tiers – When You Should Upgrade
The moment commercial use enters the picture — ads, client deliverables, branded campaigns — upgrading to a paid Dreamina AI pricing plan makes sense both for quality and legal clarity. Paid tiers typically unlock:
- More generation credits per month (significantly more volume)
- Higher resolution exports — HD, 2K (Seedream 3.0’s full output), and in some tiers 4K
- Priority generation queues — shorter wait times during peak usage
- Commercial licensing rights for generated assets
- API access for teams or automation workflows
My honest take: if you are generating more than 10–15 pieces of content per week, or if a single client deliverable requires clean commercial rights, the paid tier pays for itself fast relative to stock photo and design tool subscriptions.
The Real Pros and Cons (Truth, Not Hype)
Pros:
- ✅ Photorealistic 2K outputs that consistently outperform many competitors at the same price point
- ✅ Strong, legible text rendering on poster and banner designs (Seedream 3.0 especially)
- ✅ Very fast generation — most images complete in 10–20 seconds
- ✅ Beginner-friendly guided UI with style presets and templates — no prompt engineering PhD required
- ✅ Deep CapCut integration means no friction between generation and publishing
- ✅ Free tier is genuinely functional, not a frustrating bait-and-switch
Cons:
- ❌ Less granular control than open-source setups (no custom LoRA, no ComfyUI pipelines)
- ❌ Cloud-only — no offline mode, dependent on a stable internet connection
- ❌ Some of the best features (HD export, commercial licensing, higher credit volume) sit behind paid plans
- ❌ Regional availability differences — some features or the tool itself may not be available in all countries
- ❌ Video generation (Seedance) is still maturing; complex motion or precise character consistency in video can be inconsistent
Step-by-Step – How to Use Dreamina AI for Your Next Visual
Step 1 – Choose the Right Entry Point (Web or CapCut)
Use the Dreamina web portal (dreamina.capcut.com) when:
- You are generating standalone assets (thumbnails, ad creatives, posters) that will be used across multiple platforms or tools
- You want the full model selection and settings panel without CapCut’s editor open
- You are batch-generating multiple variations for A/B testing
Use Dreamina inside CapCut when:
- You are already editing a video and need a quick asset to drop directly into the timeline
- You want to generate AI B-roll or insert cards without breaking your editing flow
- You are on mobile and CapCut is your primary tool
The difference is workflow efficiency. I default to the web interface for client-facing work and CapCut integration for fast personal content.
Step 2 – Pick the Right Model (Seedream or Seedance)
Simple rule of thumb:
- Seedream → images. Default to Seedream 4.5 for general visuals, switch to Seedream 3.0 when your output needs readable text baked into the image (event banners, product labels, poster titles).
- Seedance → motion. Any time you need the output to move, Seedance is the only pipeline to use.
Step 3 – Write a High-Quality Prompt
The prompt is where most creators fail, and fixing it is where most quality gains come from. Structure every prompt like this:
[Subject] + [Setting/Context] + [Visual Style] + [Quality Modifiers] + [Use Case/Platform]❌ Bad: “Make a picture with Dreamina.”
(Result: generic, low-intent output — Dreamina has no context to work with.)
✅ Good: “Ultra-realistic 2K portrait of a young woman in soft studio lighting, cinematic color grading, subtle depth of field, Seedream 3.0, suitable for a beauty product social media ad.”
✅ Good (YouTube thumbnail variant):
“Shocked male creator sitting at desk, wide eyes, pointing at glowing screen, bold text overlay space at top, high-contrast cinematic lighting, photorealistic, 16:9, YouTube thumbnail.”
Always include the platform context at the end of your prompt. Dreamina’s model interprets composition cues — “YouTube thumbnail” tells it to favor centered subjects with space for text overlays.
Step 4 – Refine with Styles, Templates, and Seed Controls
Do not start from scratch every time you dislike a result. Instead:
- Change one variable at a time. Dislike the lighting? Add “golden hour lighting” or “soft diffused window light” to your existing prompt. Do not rebuild the whole thing.
- Use AI art styles and templates as a starting point. Dreamina offers preset aesthetic modes (Cinematic, Anime, 3D Render, Illustration) — these constrain the output style so you are not fighting random variation.
- Lock style consistency across a content series by reusing the same core prompt structure and style preset. This is how you build a recognizable brand look without being a designer.
Step 5 – Export and Reuse Across Platforms
Aspect ratio and resolution are the details creators most often get wrong at export:
| Platform | Recommended Ratio | Notes |
|---|---|---|
| YouTube Thumbnail | 16:9 | Generate at 2K, export at 1280×720 minimum |
| TikTok / Reels | 9:16 | Full vertical frame, subject centered |
| Instagram Feed | 1:1 or 4:5 | Square or slight portrait |
| LinkedIn / Twitter | 16:9 | Wide, text-readable |
After exporting, name your files with a consistent system (e.g., dreamina_thumb_productX_v1.png) and store them in a dedicated brand asset folder. Over time, your library of strong-performing Dreamina outputs becomes a reference set for training your prompt style — use them as reference images in future image-to-image sessions.
Troubleshooting Common Dreamina AI Issues
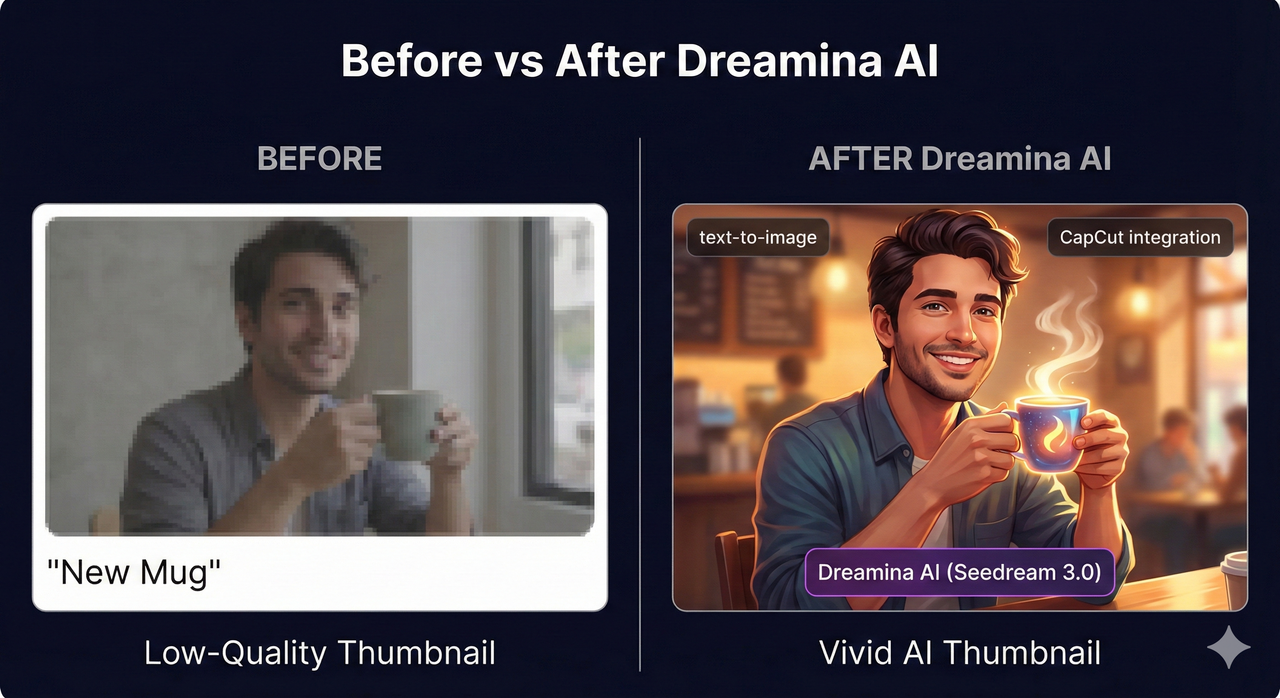
“My Results Look Cheap or Overly AI”
Root cause: Vague prompts, wrong model selection, or generating at a lower resolution than the final use requires.
Fixes:
- Add specificity to every prompt element. “A woman” → “A 30-year-old South Asian woman in a tailored blazer, confident expression, white minimalist studio background.”
- Switch from Seedream 4.5 to Seedream 3.0 for photorealistic close-up work — 3.0’s 2K output holds fine detail better.
- Raise the output resolution setting before generating, not after. Upscaling a low-resolution output after the fact rarely recovers the quality.
- Try a different AI art style preset. Sometimes “Photorealistic” mode produces uncanny AI artifacts; switching to “Cinematic” or “High-End Photography” can reduce that effect.
“The Text on My Poster Looks Wrong or Jumbled”
This is one of the most common frustrations in AI image generation broadly, not just Dreamina AI.
Root cause: AI image models generate text visually (as pixel patterns), not typographically. The more words you ask it to render, the worse the output gets.
Fixes:
- Use Seedream 3.0 specifically — it has measurably better text rendering than most alternatives in this category. CyberLink overview of Dreamina AI
- Keep in-image text to 5 words or fewer per text element. Short headlines, single-word labels, minimal copy.
- Generate the image with a placeholder or blank space where the text will appear, then add the actual text in CapCut or Canva as a type layer on top. This is my standard workflow for any poster or ad requiring precise typography.
“I Don’t See Dreamina Inside CapCut”
Possible causes:
- Outdated app version — Dreamina AI features require a recent CapCut build
- Region restriction — Dreamina is not fully available in all countries
- Wrong panel — Users often look in the wrong section of the editor
Step-by-step fix:
- Update CapCut to the latest version via your device’s app store
- Open a project → tap the AI Tools icon in the bottom toolbar (not the effects panel)
- Look for AI Image, AI Art, or AI Video — these are the Dreamina entry points
- If the options do not appear, check your account region settings inside CapCut
- If still unavailable, use the Dreamina web portal directly at dreamina.capcut.com as your primary access point — all core features are available there regardless of in-app availability
Best Practices to Get On-Brand Results Every Time
Prompt Frameworks for Thumbnails, Ads, and Reels
Copy and adapt these fill-in-the-blank templates:
YouTube Thumbnail:
[Emotional reaction: shocked/excited/curious] [subject descriptor], [setting/context],
bold composition with text-overlay space at top-right, high contrast lighting,
photorealistic, 16:9, YouTube thumbnail style
Ad Creative (Product):
[Product name/type] on [surface/setting], [lighting style: soft diffused/golden hour/studio],
[color palette aligned to brand], commercial product photography, clean background,
2K resolution, Seedream 3.0
Reel / TikTok Cover:
[Subject] in [environment], [energy/mood: energetic/calm/dramatic],
vertical 9:16 composition, subject centered, vibrant colors,
social media content, TikTok cover
Repeat the core style descriptors across all your content. Consistency in your prompt language is what builds a recognizable visual identity.
Keeping a Consistent Brand Look with AI Styles
- Save your top-performing outputs as reference images. Feed them back into Dreamina’s image-to-image pipeline for future generations to inherit the style.
- Keep a brand prompt file — a simple text document with your core prompt phrases, preferred color descriptors, lighting notes, and which Dreamina model worked best for each content type.
- Use the same style preset for all content in a single series. Switching between “Cinematic” and “Anime” between episodes breaks visual brand coherence even if the content itself is consistent.
Ethical and Licensing Considerations
- Commercial use requires a paid plan that includes commercial rights. Do not use free-tier outputs in paid ads or client deliverables without confirming the licensing terms at the time of use.
- Avoid generating content depicting real, identifiable people without consent — both ethically and legally this is a significant risk area.
- Always check the latest Dreamina Terms of Service before using outputs in commercial campaigns. Platform policies update regularly, and what was permitted last quarter may have changed.
Should You Use Dreamina AI as Your Main Visual Tool?
When Dreamina AI Is a Perfect Fit
Dreamina AI is an excellent primary tool if you match this profile:
- You are already inside the CapCut ecosystem and want generated assets to flow directly into your editing timeline
- You produce high content volume — thumbnails, covers, teasers, ads — and need fast, repeatable quality
- You are a non-technical creator who wants photorealistic results without learning prompt engineering at a deep level
- Your visual needs are social-media-first: 9:16, 16:9, 1:1 formats for TikTok, YouTube, Instagram, and LinkedIn
In my experience, it is one of the fastest paths from a content idea to a finished, usable visual for exactly this use case.
When You Might Need Something Else
Dreamina AI is not the right tool for every job. Consider alternatives if:
- You need custom model fine-tuning (LoRA, DreamBooth, custom checkpoints) — open-source pipelines like ComfyUI or Stable Diffusion locally are better suited
- Your work involves highly technical or scientific imagery where accuracy matters more than aesthetics
- You need offline generation — Dreamina is fully cloud-dependent
- Your team needs a self-hosted or API-first solution with full data control for enterprise compliance
Quick Decision Checklist
Before committing Dreamina AI as your main visual tool, run through this:
- ☐ Content volume: Am I generating 5+ visual assets per week? (Yes → Dreamina makes sense)
- ☐ Platform focus: Is my primary output YouTube, TikTok, Instagram, or CapCut-edited video? (Yes → strong fit)
- ☐ Budget: Can I justify a paid plan if I need HD exports and commercial rights?
- ☐ Commercial rights: Will these visuals appear in paid ads or client work? (Yes → paid tier required)
- ☐ Technical control: Do I need custom model training or fine-tuning? (No → Dreamina fits; Yes → look elsewhere)
- ☐ CapCut user: Am I already editing in CapCut regularly? (Yes → the integration alone makes Dreamina the obvious choice)
If you checked 3 or more of those boxes, Dreamina AI is not just a reasonable choice — it is likely the most efficient tool available to you right now for professional-grade AI visual creation inside a creator-friendly workflow.
Have a specific Dreamina AI question or a result you cannot get right? Drop it in the comments — I read every one and answer the most common issues in follow-up guides.
Leave a Reply